After modding one Lack bookshelf I don't think they'll work. After all my cuts, and re-stiffening the shelf, it still wasn't holding up and it takes a lot of time to mod each shelf. Looks like the shelf design are leaning toward standard dado cut built-ins. I'm still on the hunt for decent designs and construction details... Anybody know of other decent options that simulate a floating look but could take the weight of books?
Sunday, March 30, 2008
Saturday, March 29, 2008
Built-In Bookshelves Drawing
To make sure I hung the shelves right, and to help decide what size TV to get I made an AutoCAD sketch of the built-in area. 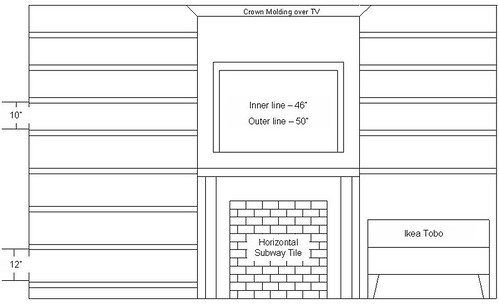
To compare, here is a shot of the area before the renovation.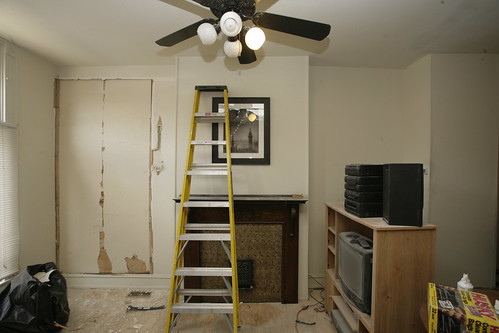
The framing and drywall of the area is complete, with an electrical outlet added behind the TV space, and a wireway created to the entertainment unit. Also, speaker wire has been run behind the TV to allow speakers to go unobtrusively on the shelves. Thus far, there should be no way to see any wires.
The shelves will most likely (read, if they work) be a white Ikea Lack, modified to fit. I bought a couple shelves to play with; hopefully I can make them work, as I really like the frameless look and I can only use the framing wall behind the shelves for bracing as a couple of the side walls are not structurally sound. The max load per shelf is listed as 18-44 lbs, but I am decreasing the depth of them by about 20%, and trimming down the length 15-25%. This should increase the load capacity, especially since I'll be stiffening up the frame too.
The television will be a 46-50" TV, wall mounted on a tiltable mount. The lines on the drawing show both sizes, which I'm town between. While I'm all for a nice big TV after living with a 20" TV for the last 10 years, I don't want to get too big from a height perspective. While the width is nice, the couch sits across from the TV about 10' away, so going too high means you are looking up at it. The bigger the screen, the more you have to look up. Gotta love the limited design trade space due to having a small space.
For the electronics storage we purchased the Ikea Tobo. We needed something to fit the electronics and had a way for the IR signals of the remote to get into the cabinet. The 19" depth and glass front accomplish these goals. While I would have preferred a more mid-century modern wood piece, the width of this indented area really limited us. If something nicer comes along we'll get it, but this will work for now. 
The tile area in front of the faux fireplace will be tiled over with white subway tile (yay for $1.50 sq/ft tile from HD), and the mantel painted white. The hardie-board is laid down and I'm waiting to borrow a tile saw to get this project done. The ceiling fan in the above picture is also no longer. The light would have shone onto the TV and the width it gone and can lights put in the 9' ceilings are definitely more noticeable.
Tuesday, March 25, 2008
So... Do You Come Here Often?
I've been noticing more comments lately, even on old entries, so I've been wondering where people are coming from: google, Houseblogs.net, family, friends and coworkers that are (silently) lurking around here, and who else? So I went looking for links... When I Googled "Baltimore Rowhouse" my blog comes up on the first page. Pretty cool! If you are reading this, who are you, where did you come from, and what brought you here? I'm curious to see how people are stumbling onto the blog.
As an aside, I've read many blog posts about people being able to tell which search terms are bringing hits to their site. How would I go about doing this?
For the newcomers, if you are curious for progress on the house, check out the tags on the bottom right side of the page. They describe categories of work on the house, and should help point you to the category that you'll find most useful. There are also links to other houseblogs I read, as well as design inspiration sites, like Apartment Therapy.com.
- ++
And since we're getting to know each other, I'm a libra. In case you were wondering.
Monday, March 24, 2008
Scope Creep and the 5 Phases of Renovation
Phase 1 - I want everything. I want it now. Cost doesn't matter, so I'll pick the most expensive materials AND I'll have someone else do it.
Phase 2 - Phase 1 costs too much. I'll do it myself, schedule be damned.
Phase 3 - The cost is ok, but the orginal plans will take too long. Cut scope.
Phase 4 - I really want everything in Phase 1, schedule be damned.
Phase 5 - What have I gotten myself into. Time to re-examine Phase 1.
I am in Phase 4. After deciding long ago that built-ins and recessed lighting in the first floor wasn't required, both projects are well on their way to completion. I decided that with the LCD over the fireplace the ceiling fan wouldn't look right, and would have light shining right on the screen (see pictures from previous post showing fan), thus Saturday was spent cutting holes in my ceiling with a reciprocating saw. The taste of drywall, plaster, lathing, and 100 year old dust is fresh in my mouth. Normal people wouldn't inhale such a cocktail, but I am not quite normal.
Here is a primer on my safety plan at the house. Work safely, when convenient. Which is never (I exagerate a bit). This drives The Queen's parents crazy, seeing as they write a safety memo for a engineering company. They make fun of me incessantly for this, to the point where our Easter basket was a Home Depot bucket, decorated as a bunny no-less, full of chocolate and safety gear. Back to my original point of my ceiling cocktail. When I wear safety glasses and a dust mask, the glasses fog up. So which is more important: scratching a cornea, or breathing chunks of ceiling? I chose to keep my corneas intact at the expense of my lungs.
The highlight of the weekend wasn't having can lights working and fixing my electrical problem downstairs, it's that I didn't electrocute myself. It doesn't hurt that the can lights don't look half bad… Sure I'm behind schedule, but I don't really care at this point.
Monday, March 17, 2008
Kitchen Television
After much waffling on a TV for the kitchen I decided on the 23" Samsung LNT2354. 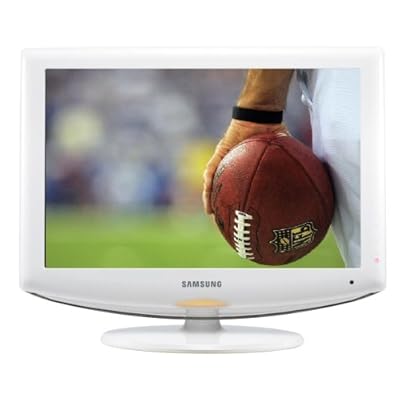
It will be mounted on the corner wall jutting out into the kitchen (you can see the outlets on the wall if you squint). The sleek whiteness of it will look great next to the crown molding, and it will be in a good position to watch TV from the breakfast bar. 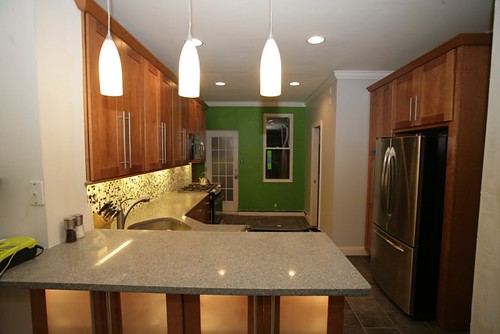
The house is also full of building materials thanks to Leigh's brother's help. We went to the Home Despot last Tuesday and loaded up the rental truck with drywall and lumber goodness. I definitely appreciated the help.
On a sidenote, renting a truck was cheaper than renting a wallpaper remover. Interesting.
Monday, March 10, 2008
A Wise Investment
Renovating a home means constant runs to your local home improvement store. I probably go to the local HD three times a week for miscellaneous supplies. All this adds up. To a lot. Occasionally I get coupons from Lowes, or I hear of HD coupons for 10% off. Also a heads up that HD and Lowes honors their competitors' coupons, so if you find a good deal at one big box store you can use it at the local store you prefer. Sometimes you get these as part of a package when you change your address or just randomly in the mail. Seeing as HD is my second home, a coupon every few months while useful, doesn't help me as much as it could. Enter Ebay.
Ebay has many folks selling 10% off coupons on the site. The price is generally around $3.00 per 10% off coupon, and you can buy them in lots ranging from 1-25 of them. For $25, including shipping, I got 8 of them. Spending $25, has saved me about $100 so far and I still have half of my coupons left. Not a bad deal at all.
Motivation was majorly lacking this last week, so progress on the home front was light. While I had a three day weekend I got remarkably little done in the past week. I ran new electrical and conduit in the built-in area for all the electro-geekery, hung the LCD mount in the kitchen, butchered a cabinet doorhung the last of the kitchen hardware, changed out the dining room light, picked up all the backerboard for upstairs and some downstairs tile work, ordered slate tile for the upstairs bathroom, laid the backerboard over the fireplace tile and foyer floor, did some more drywall mudding and sanding, finally got the trash hauled out of the back yard, and ripped out 2/3 of the linoleum floor in the upstairs bathroom.
This week I should finally finish trouble shooting the foyer electrical (need a second set of hands), lay new tile over the fireplace, finish framing for the TV over the fireplace, get all the drywall and greenboard delivered, install the drywall on the built-ins and fireplace, drywall the knee wall, and hopefully start really finish out the foyer floor, drywall and trim.
Monday, March 3, 2008
Built In Demo & Framing
Pictures from my post about the Built-Ins.
After starting the job I realized a proper before shot wasn’t taken. This is taken from roughly the couch’s new viewing point. Pay no attention to the 2.68” thick layer of dust on everything, or the entertainment center sitting in the middle of the room. (If I had another place to put it, I’d move it.)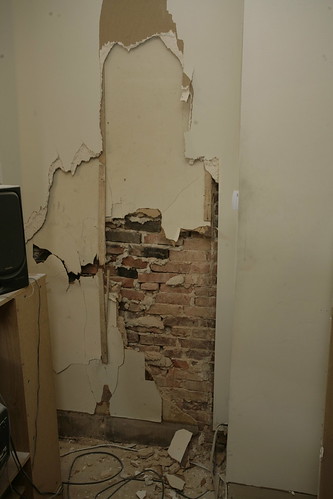
Luckily the right-hand cove was getting framed over because the brick looked like crap. We could even see into the (unoccupied) rowhouse next door. I filled this gap with cement, and we framed it over. I am just glad the exposed brick side of my house looks as nice as it does. Pure luck…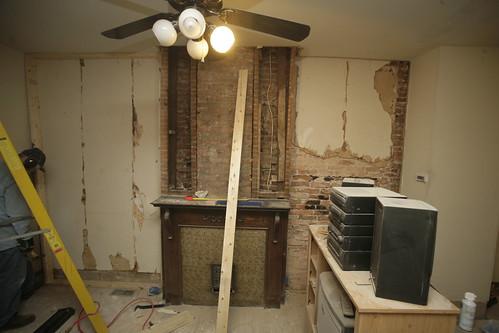
Part-way through the demo the project started to take shape. Eventually the mantle will be painted white, and for now the tile in the fireplace will stay as is. Since the dust was a-swirling, I got the quick shot and got back to work. I hate painting over wood with such a nice grain, but I don’t think the natural wood will fit with the rest of the house, and with it white it hopefully makes the tile pop. 
After the space was framed out you could really visualize the space. I can almost see the shelves and the wall mount TV now. *sigh*
Bawlmer, Hon - A Photo Tour
Baltimore natives slur the city's name into words like Bawlmer, or Baldamore. In some parts of the ciy people even ad a 'Hon', just as Southern ladies in the Deep South sometimes add a 'Shugah' at the end of a sentence. In honor of the city's heritage, here are some pictures of the area that I've taken.
Taken from my my front steps, which are slabs of marble like the Aubrey Bodine picture I use in my profile. The Patterson is an art theater that has art exhibits, housing local artists, as well as hosting occasional burlesque shows. 
The Patterson Park Pagoda, which is in the 184 acre Patterson Park 2 blocks from my house. Well, the pagoda is on the other side of the park, but the near side of the park is two blocks away. :) If I ever build a roof-top deck you can see the pagoda from it. 
A shot of some daffodils in the park. The weather was nice, and these are reminding me of spring. 
A picture of the Dominos Sugar mill sign taken from across the bay in Fells Point. The neon sign is the size of a basketball court.

Camden Yard on a typical night, because the O's suck. 
Fort McHenry, a national park across the bay. 
Patapsco State Park, just south of Baltimore close to my work. 
A wide angle shot taken under a cutleaf japanese maple at Cylburn Arboretum. Neat place in the city.
Built-In Wholesome Goodness
Having limited square footage you have to get creative to make the space work. My house is about 12'-6" wide (45' deep) on the interior, with a single open space on the main floor. While this lends itself beautifully to an open floor plan, it makes room arrangement and furniture usage and placement annoyingly difficult. To best make use of the layout the Queen and I made an executive decreedecision to add built-in bookshelves. You see, I have what used to be a fireplace near the front of the house. It now contains a HVAC grate. Lovely. I can't just remove the old fireplace completely since my water heater and furnace now vents through the old chimney. The old fireplace sticks into the room, creating two 10" depth spaces on either side of it. Currently this space isn't very usable. We decided to change this. Keep in mind that living in a rowhome originally built in 1900 guarantees a couple of things.
1. Nothing will be level.
2. The brick walls adjacent to your neighbors are a combination of plaster/cement, with firring strips and drywall on them.
These two items made the decision to make built-in bookshelves difficult. We couldn't just attach some shelves to the wall, since they probably wouldn't be very level, and there really wasn't anything to brace the shelves into. Dadolescent and I ripped the drywall off the wall, exposing the plaster and framing around the fireplace. We reframed walls attaching into the ceiling and floor joists with 2x4's, which will hold approximately 1,000,000 lbs of books. Trust me, I did an engineering calculation? Since we used 2x4's the shelves can't be more than 7.5" deep or they would protrude past the fireplace - probably should have used 2x3's, but a bit late for that now. Anyways, since the new knee wall means the couch will offer a direct view of the fireplace and shelves, this offered us a problem of where to put the TV. Should it go in the cove to the right of the fireplace, or above it? We decided above since the fireplace was already a visual draw, and bookshelves surrounding the TV are flat out sexy.
With 60" of width above the fire place, we decided a 47"-50" flat screen would work well. A 36-63" LCD tiltable wall mount is now ordered, and framing and electrical above the fireplace will commence this week. I'm going to put electrical and cable behind the new TV, placing conduit for a wire chase behind the drywall from the TV to the electronic gadgetry located in the right hand cove. This means no visible cables running from the TV to the cabinet. The Queen and I argued about whether this should be a floating credenza or not (I think it should, so I can hardmount electrical into it), but the Queen doesn't like this idea. The ball is in her court to find a 48" credenza for this area that:
A. Looks Hawt.
B. Is 48" wide.
C. Is a minimal depth. The shelf depths will only be 7.5" deep or they would protrude past the fireplace, so I'd like to minimize the credenza depth jutting out in the room.
D. Looks Hawt.
E. Can hold electronics, and be able to receive an IR signal from a remote. This means it has to be either open or glass for part of it.
F. Is a normal height. A lot of stands nowadays are meant to sit a TV on top of them, causing them to be extremely low. Since our TV will go elsewhere, something higher would probably look better.
G. And Looks Hawt.
There is also the possibility of a built-in credenza. The issue with this is the space is like 50.5" wide, and my cabinet building skillz are non-existent. The shelves will go above the credenza shelves. For now, the plan is for the left of the fireplace to be all shelves.
For shelves I am still thinking of how best to design the shelves to minimize the visual impact of the brackets and my installation time, while also making the trim around the shelves (crown and baseboard) work. For now, I am leaning toward modifying Ikea's white Lack shelves to shave some depth and width off to fit the space. This would solve the problem of showing brackets, as their brackets mount inside the 2" high shelves for a seamless appearance. 
There is also the possibility of going with fully customized bookshelves, but I don't know if it would look as good as the above option, and I think the install time could be a lot greater. The jury is still out on this.
*I’ll add more pics to the post when I upload them in a couple hours.
Subscribe to:
Posts (Atom)
