After searching for glass tile mortars locally I decided I want a contractors license, or at least whatever allows me to buy materials only available to contractors.
I went to a tile place before work today and the cashier asked me if I was a contractor. I said no. This rendered me ineligible to receive her mortar-y goodness. Is there any way around this? I don't want to become licensed, and have to pay insurance just to work on my own house, but some discounts and the ability to buy the building products I want would be nice. Maybe being an engineer would help, but I doubt it helps to get me past the "Applicants for a contractor's license must provide proof of at least two years of experience in home improvement work, construction and/or related education" rule. Any ideas?
Also, to my family and friends, it is ok to post replies to this blog. In fact, I prefer if your comments are here (as opposed to email) so then I can keep track of all your advice. And yes Leigh, this means you too can comment instead of just blog-stalking. :)
Wednesday, January 30, 2008
Wannabe Contractor
Monday, January 28, 2008
Cabinet Conundrum
The downstairs powder room is a tight fit at 74" x 39". The door is near the middle of the room, and the sink and toilet oppose each other on the 39" walls with a small casement window over the vanity. The vanity is nice and small with a more of an espresso finish than the one pictured below.
Over Thanksgiving I also picked up a mirror from Lowes, which was also supposed to be espresso. Apparently espresso means different things to different people, because I took the mirror out of the box and it's black. *sigh* At least the mirror doesn't go over the sink, so the mismatch won't be quite as evident, but I am a bit annoyed.
To balance out the room I am on the hunt for a cabinet to go above the toilet. Ikea's Akurum - wall cab horizontal w/ glass door, has a cool glass front, is available in a 39" width, and is running around $100-150 bucks. Score! There are a bunch of different finishes and glass combos so I'm not sold on a specific one yet, but the one pictures below painted red could be pretty hot. 
If I don't go with such a wide cabinet above the commode, the red Ikea Benno CD/DVD towers could look good on each side. They are 8" wide and the toilet has 10" on each side, so they could be a nice fit. 
Both Ikea items are looking nice but the cabinet over the toilet makes more sense from a storage perspective. I could fit both but it might cramp the small place a bit much, and the glass cabinet is twice the depth of the CD shelves. Either way I go the price is right, as I've really been trying to trim costs in this room.
Non-Buyer's Remorse
Does anybody else ever get a sense of dread over home renovations? I do. Sometimes I think of all the stuff that needs to be done, and it simply overwhelms me, allowing me to focus on nothing more than the enormity of COMPLETING THE WHOLE RENOVATION AT ONCE. It's times like this that I need to take a breath, work on a task, and then revel in the fact that I have accomplished anything.
I guess the cause of it today was a case of non-buyer's remorse. What is that you say? It's when you agree to complete a task yourself, when you have never done it, and have heard it's a difficult task in the first place. This task is installing glass tile backsplash. 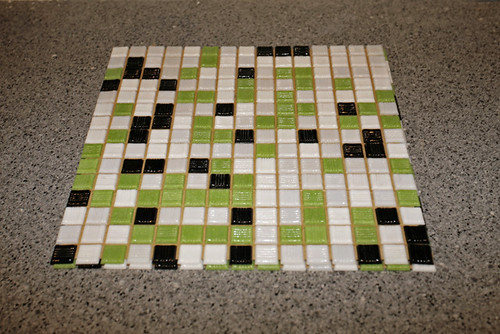
The engineer in me needs to know EVERYTHING before I commit to a task. Not a good trait, but one that definitely causes me to heavily research any renovation project, making sure that I cannot only complete the task, but I can do so in the most efficient and expedient manner possible. I need to chill.
So to help calm the nerves I'm making a to-do list, and am going to finish scrubbing my wall with acid. The scrubbing will give me some instant gratifaction, and making a list of things that need to be done before refinancing my house so I can focus myself in the next week. I put my nest egg toward paying a contractor to renovate my kitchen and add a half bath downstairs, but now I need to pull some equity back out to pay for making my one uber-bathroom upstairs into two bathrooms. In order to maximize the money I can take out, I need to make the downstairs perfect, hence a list so I don't dilly dally on things that don't matter to my immediate goal.
Things to do before Appraisal
I'm starting to feel better already. Time to put on some Ray Lamontagne and play with acid.
P.S. My pantry cabinet is now installed, the fridge has found it's rightful place in the kitchen, and I now have a functioning bathroom downstairs.
P.P.S. Since Leigh is away most of the week on business, and I miss her, I'll post an old shot of her too.

Sunday, January 27, 2008
The Arched Cove
The consensus is the arched cove will stay as it is: plastered and drywalled. Eventually my couch will sit under it, and it will look good with a large picture in it. Maybe some ceiling mounted halogen lights to spotlight one of my pics. Eventually.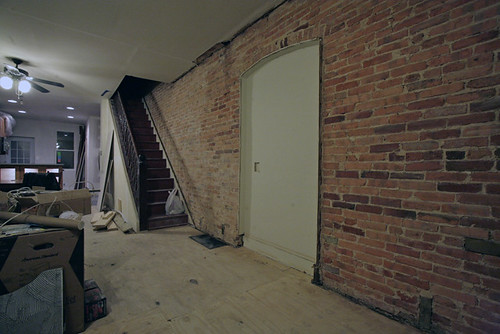
Any ideas on how to trim it? I am at a loss of how to tastefully conceal the gap made by the build-up of drywall, furring strips & drywall. It's a big ol' gap. 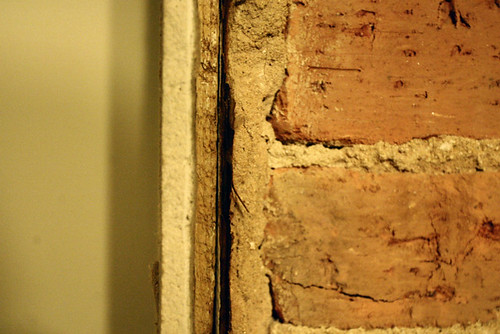
It was a tough couple of days exposing the brick, but definitely worth it. Now I need someone to haul away the 50 bags of heavy debris out of my back yard. Anybody willing to help out? :)
Saturday, January 26, 2008
Design Daydreams
While in the middle of exposing the brick along my stair wall I daydream design choices for my main room downstairs. The wallpapers at ferm-living are an idea to use in one of the coves in my room. It's not for a whole room, but I was thinking about building some built-in bookshelves and putting some ferm paper up behind it. 
Also, I don't know what to do with a small arched cove in my brick wall. The brick is all exposed around it, but part of me thinks I may keep the cove drywalled/plastered. I kind of like the contrasting look, but am at a loss of how to trim it out - the engineer in me can't helping thinking like this. Pictures are forthcoming.
Wednesday, January 23, 2008
Wood Floor Choices
Deciding on wood types for major items in a house is a conundrum. I selected a maple cabinet with a cherry-like finish, but am waffling on what floors to use in my living room floor. Before berating me for covering the old floors with subfloor, realize that they are an old pine with lots of gaps and squeakiness. They are easily dented and scratched and not worth the money to refinish. Even if I did refinish them, the wood on the stairs doesn't quite match, so it would only make this issue more obvious after refinishing. So, now that the subfloor is in I need to choose what type of wood floor to put in.
My main criteria for judging a floor are,
A. Look good
B. Low Maintenance
To minimize maintenance I believe in the Janka scale. Wikipedia says "The Janka test measures the force required to embed a 11.28 millimeter (0.444 inch) steel ball into wood to half its diameter.". While I don't need to know the actual force for this task, it offers a good comparison of wood hardness, and hence durability of the wood floors. A high Janka scale number coupled with a nice finish means that I don't need to worry about scratches and dents. For a reference point, oak is about 1300 on the janka scale while pine is between 300 and 600, depending on the species.
My main contender is Brazilian Cherry (Jatoba). I am a bit concerned with using such a dark color in a row home with such little light, but I like the general look of it and it has a Janka hardness of 2350 (oak is around 1300), so it should hold up pretty well. I also considered something called Brazilian Cherry Lite, which looks similar but is a bit lighter. More research showed Cherry Lite is actually referred to as 'Guajara', and has a hardess of around 1300. Not a fan of such a soft wood. Also, seeings as I will most likely have darker wood furniture in the home, I'm not sure both dark woods and furniture would look good.
Another option I like is hickory. It has a Janka scale of around 1800, and looks totally different than the Jatoba. It has a high variance across boards that could either be interepretted as interesting, or ugly. I'm not sure which is a better assessment... To me the floors look modern, and while I like them, I am worried about being too bold. The darkness of the cherry makes for a cozier look, while the hickory seems to offer a cooler look for the room. What are your thoughts? Any other high hardness woods that look good? Let's try to keep it around $4.00 a sq ft or less - extra points for engineered hardwood, and no way on laminate.
I am also still deciding on how to run the floors. Most likely I will run them planks running the length of the house, but am also considering running them at a 45 degree angle. I think running them at an angle could add some visual interest.
- ++
I also decided on stools for the breakfast bar today. I'm going with Holsag Carole's, in a wild cherry finish (matches the cabinets) and a gray'ish black seat. They take about 4-6 weeks to arrive, so it will be a while until Leigh and I are able to enjoy them.

Monday, January 21, 2008
Kitchen Pictures - Before & During
The downstairs kitchen renovation began in September of 2007, almost one year after the initial purchase of the house and has been continuing since. The kitchen used to be on the stairway side of the house, but after much convincing by the parents we decided to switch it to the opposite side of the house.
I looked back for pictures that show just how bad the kitchen was, but being such an eyesore I wasn't excited to photograph it. Here is the best shot I have showing the kichen area before the renovation. Notice the kitchen on the stair-side wall, no downstairs bathroom, the old door, two windows, the lovely hole in the ceiling that happened one day before my parents visited, and the plaster & drywall on the stair wall (at least until this weekend). 
I really wanted a bathroom downstairs, as there was only one bathroom in the house (unless you count the throne in the basement, which I'll get to later). I would have really liked to have an island, but putting a half bath in the middle of the house made the middle area pretty useless. A bathroom there would have left a width of about 6', too narrow for a table, making the house feel cramped. Now a half bathroom is fit in the back corner of the house allowing a real dining room. A lot of homes in Baltimore city have odd floor plans due to the skinny rowhomes floorplan here, so anything done to maximize the space helps. Here is a shot of the new kitchen with a half bath where the old kitchen was. Also notice the outlet and cable hook-up for my (eventual) swivel-mounted LCD TV to watch from the breakfast bar. :)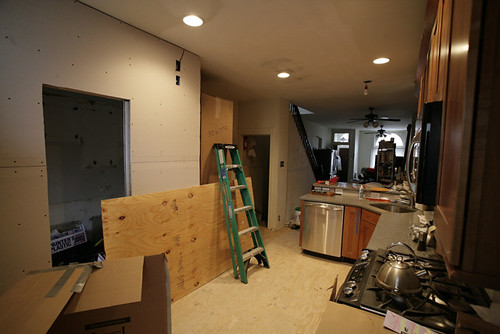
Since I couldn't have an island and a bathroom downstairs, we decided to put in an L-shaped kitchen with a peninsula coming out in the main area of the house. To lighten up the room I chose glass faced cabinets and had lights put in them. Glass shelves were put in the cabinets, and the glass frosted to diffuse the light. It looks pretty sweet, and when the triple-pendant light over the penisula is put in it will look pretty sweet. 
Friday and Saturday the tile went in, so that looks pretty sweet. Definitely glad I went when the running pattern, and the 12x18" tile run along the length of the house. It helps elongate the room, methinks. The sign on the floor says "keep off", but I don't think Cat paid attention to it. 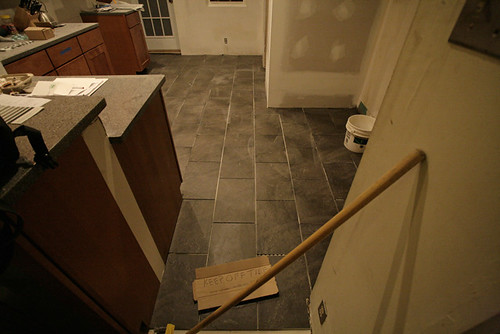
Some miscellaneous info on the kitchen. The cabinets are Kraftmaid, with Putnam maple doors in a Toffee finish. The upper cabinets are 42", with an angle crown molding above and a smaller molding on the bottom to allow for under cabinet lighting to be installed later. Next to the bathroom on the stair-side wall is a pantry cabinet that is yet to be installed, with the fridge going next to that. The old 28" back door was replaced with a 32" wide to allow more light and larger sized furniture into the home. The door is glass, with a plastic film that looks like frosting when installed. A window on the right was removed from the back wall as the new bathroom wall would have intersected in the middle of a window. The window was replaced with a smaller opaque casement window to bring light into the bathroom.
What Not to Do - Take 1
Do not (accidentally) dump a bucket of dirty mopwater on a gap filled upstairs floor. It will drip through the ceiling fan below, and onto your new subfloor below.
Sunday, January 20, 2008
More Brick Stripping Fun
The brick wall was wire brushed (used a brush from the grill), and then used muriatic acid diluted 10:1 with water. It worked great to get the plaster and mortar off the face of the brick. Watching the water and lime in the mortar fizz on contact was a bit disconcerting, but all part of the fun. It took a fair amount of elbow grease but the mortar all came off.
For now I am reasearching how to seal the brick. There is quite a debate regarding this topic online. Some people saying not to say it at all, while the other camp say to seal it but don't agree on a sealer to use. I've seen some brick in Baltimore that has a shiny look to it, which I don't like. I may just keep it unsealed for a while unless somebody can tell me a good matte sealer that can be purchased locally. That or until the dust from the wall bothers me too much and I pick up whatever Home Depot (HD) carries...
Lesson Learned: Be careful of what sprayer you put muriatic acid in. The sprayer bottle I purchased had metal in it for the pump spring, or some other metal in it associated with the pump. After about 20 minutes the sprayer wouldn't pump, as I assume the metal corroded out. A trip to HD later and I had a more expensive spray bottle for rougher chemicals - no metal at all in it. Of course being at HD allowed me to also purchase a much needed shop vac. :)
Exposing Brick
I decided to expose the brick in the wall adjacent to my stairway. This wall is continous along both the first and second floors. With my kitchen floors getting grouted yesterday morning, I thought it best to minimize dust downstairs. I had made a test cut in the drywall downstairs to see what was behind it. Turns out it was plaster applied to the brick, so I knew things were going to get a bit messy. The main bedroom was the first to get attacked, as the longest wall in the room had no (visible) electric runs along it. After reading a plethora of information on the web regarding exposing brick, I decided to just start tearing apart the wall and figuring it out as I go. For tools I used, a hammer and a couple of chisels. Safety glasses and a paper mask were used occassionally. :)
I made a hole in the drywall with a small saw, then started ripping the drywall away from the plaster. It was easy to remove as it was only attached to the plaster via furring strips along the edges. Not the most solid installation, but I'm not one to complain when it causes me less labor to rip out. A few hits with the small chisel made me wonder what I was getting it into. After the small chisel got things started, the larger chisel would come into play. I learned as I went along to start in an upper righthand corner, and move down and left. This works well if you are right handed as it allows an easier hammer swing. 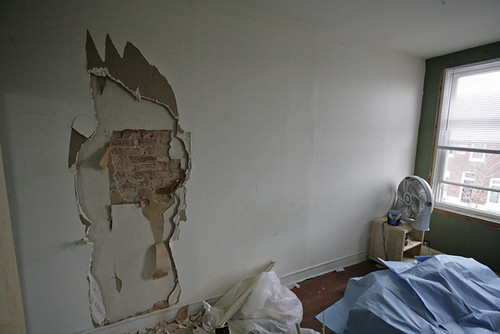
I also learned that less is more, when it comes to the amount of chiseling and prying to do. By using the larger chisel as close to parallel with the plaster between the wall, I hammered in the space as far as I could, trying not to pry. This was akin to peeling wallpaper slowly to keep them in longer strips. A lot of prying means a lot of chiseling. After a couple of hours Leigh showed up, and we started cleaning as we went. Chiseling is the easy part - clearing away all the debris is the hard part! 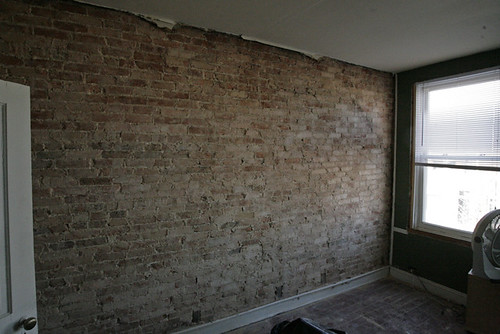
At the end of the day, the work was well worth it. The mortar is in decent condition, so I am going to try to avoid grinding our the mortar and repointing the brick. I like the natural look as is, and I really don't feel like making a bigger mess with an angle grinder. Today I get to brushing the plaster out of the brick, and using some muriatic acid on the brick to clean them.
Saturday, January 19, 2008
First Post!
Due to high contractor bills, and a sudden willingness to get into projects way over my skill level I've decided to take on more renovation work of my house. The kitchen is nearing completion after a contractor did the work on it, but the money is gone so it's time to cut costs. Let the adventure begin.
A little bit about the house. It is a Baltimore Rowhouse built in 1903, that is 13'-3" wide, by 45' long on the main floor. When I purchased the house in September of 2006, it had two upstairs bedroom, a full bathroom upstairs, and an unfinished basement. Oh, and a throne in the basement but I'll get to that later... The rest of the house had some upkeep done to it, but it was by no means renovated. After dilly dallying for a year, work finally began on interior renovations in September of 2007.
Also, since it's introduction time, here is a picture of my girlfriend (Leigh) and I.
Subscribe to:
Posts (Atom)
