Instead of spending the last couple of years renovating, I've been off getting married, getting fat, and doing many things other than renovating. But now it's time to get back to work. In the past few months the Queen and I have been busy finishing up the crown molding upstairs, redoing the bedroom in a Restoration Hardware style, and have started to finish the basement. The first two items will be covered in later posts, but for this post I'll focus on the basement. Or from now on, I'll call it the pit of despair, or just the pit. The pit has been so horrendously scary for the past couple of years we've been afraid to do anything with it. Check it out...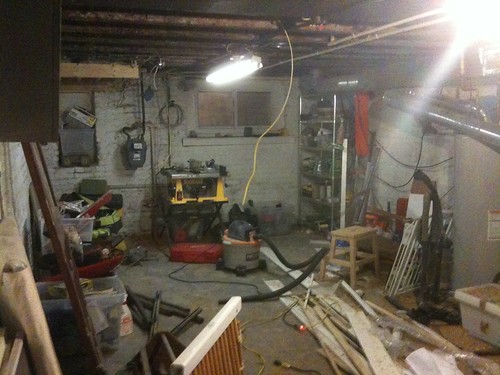
Scary, eh? And this is after I spent a long time cleaning it and selling a ton of crap on craigslist. After making it so I can actually see the floor I have motivation to now cover it with plushy carpet and make it my mancave a non-gender specific den. I have so much motivation that I told my father about it and ask him to come in from Michigan in a few weeks to help renovate it. Oh yeah, it's on like Donkey Kong...
In normal spaces renovation is pretty straight forward as there are usually flat floors and ceiling free of obstructions, and you are usually nailing into all wooden surfaces. Not in a basement. My basement has a crusty old uneven floor, the height is about 6 and a 1/2 feet to the joist, and the edges of the rooms are an obstacle course of ducts, plumbing and other goodies. To get ready for this I've started drilling holes through the joist to re-route the electrical and plumbing, and to draw the place up using Google sketch-up. It is going to be a framing nightmare, but once I figure out the floor plan I'm hoping I can do up the place pretty nice.
Since I bought the house in 2006 and did a quality renovation, there is zero chance I will get back all the money I put into it. I've come to accept this. That said, the basement renovation plan is to make a space that is usable as a second entertaining space for a very low budget. I'm hoping to to it for under $4,000. This means there will be sacrifices.
- 1. We aren't digging out the basement. With a ceiling height of about 6 and a 1/2 feet, there isn't much height. To dig out the basement would cost on the order of $30'ish bucks a square foot. There is no way I'll make this money back. To make the space not feel claustraphobic I'll be using recessed lights and trying to keep as much headroom as possible.
2. While we only half 1 and 1/2 baths, we aren't putting in a new bathroom in the basement. This would require smashing through the floor, and then without raising the ceiling height we probably couldn't put in a shower. While it would be great to have another bathroom I just don't think it's worth the expense.
3. The floor is old uneven cement, and it's going to stay that way. My plan is to carpet over the old concrete. To rip out the concrete, or to attempt leveling it would be some big bucks.
4. I will only finish the front 20 to 25 feet of the basement. The total basement depth is 45 feet. The back area house a nice storage area and the laundry area. While it would be nice to have a finished laundry area, it just isn't worth the money. Also, I really like having some unfinished space in the basement for storage.
5. I will try to work with my existing HVAC, water heater, and water meter locations. To move my main mechanicals will cost me thousands, and while the constrain the space more than I'd like, I think if I optimized thing I'd only gain a few extra square feet of useful area. My plan is to be creative using lots of storage in hidden/unusable corners and crannies.
Next post I'll talk a bit more about the design and some of the design trades I'm thinking about such as whether to make this a future bedroom with it's own door, adding a closet vs. a mini bar area, and building a custom entertainment center with built-in book shelves.

16 comments:
I wish you luck with sticking to the budget! We did ours in '08 and here are some pics to show the progress and final product (we had a similar layout as the pics you posted) if you need any ideas on framing:
http://www.flickr.com/photos/grantandamanda/sets/72157601608188084/
The last page shows the final product. Good luck!
Amanda, great work, and after seeing this I have loads of questions - hopefully you'll be able to help me? Pretty please?? :-)
1. How did you attach the bottom sole plates to the concrete. I'm considering getting one of the nail guns with a gunpowder charge, vs. just construction adhesive vs. masonry anchors.
2. How difficult was it to do you stairs, and do you have any suggested online resources, or just general tips on this job? I think I need to do this, but am definitely dreading it. I also like how you have it open on the bottom and am now thinking about doing something like this to make more finished space.
3. If you don't mind my asking, how did you do against your budget? I just made up my number off a gut reaction, so I should probably list everything out.
4. I saw a lot of pics of unlevel floors near the walls. I will have this issue and am not looking forward to dealing with it.
Great job, and I can't wait to have mine done too. :-)
Corey- We must be on the same schedule because we are in the process of getting some estimates for the concrete work on our basement right now. Unfortunately, our basement NEEDS some basic work before we can do anything down there (hardly a floor and a dirt crawl space). I am jealous of you and Amanda, though, our house is only 12' wide and yours both look like palaces! Looking forward to seeing the progress.
Amanda- Your basement is awesome. Great job. Is your ceiling height the same as Corey's (and mine) at 6.5'?
Looks like you used a sewage ejector for your bathroom, did you install that yourself? Was it easy? Did you get it from HD or elsewhere?
First of all, I am so, SO GLAD you're back!!!
Secondly, I cannot wait to see the magic you work with that um....shall we say "raw" space! After seeing the magic you worked with the upstairs and the backyard, I'm really excited!
I think you're making some good tradeoffs- underpinning a basement is not only hugely expensive, but can destabilize your foundation if it's not done correctly. And, if you're only finishing half the basement and NOT putting a bedroom down there, you don't really need a bathroom, in my opinion (although our basement bathroom shower has 6.5 ft ceiling clearance, thanks to our stupid HVAC, and it still works, so it can be done!)- if it's just for hanging out and TV watching you can easily hop up the stairs to use the facilities.
And, I hope you are better with a budget than I was- I was in charge of our basement reno, and I pretty much napalmed the budget into submission. Whoops!
Anthony - we totally are. Let me know if you need any help, because I love learning on other people's houses before I screw my own place up. :-)
My house is only about 12-3" wide on the interior, so I wish it were wider. In the future and I choose another rowhouse I will accept nothing less.
Kat - your telling me that you fit a shower in that same height is encouraging me in the wrong monetary direction. :-)
Corey-
1. We attached the bottom sole plates with a ramset (it has the gunpowder charge and you hit with a hammer/mallet iirc).
2. We decided to have 84 lumber make the stairs and deliver. They came out, measured and told us the best route. It was worth the cost (iirc, 1200?), but I would say you can get cheaper custom stairs made if you are just going to cover in carpet (we wanted our stained). The installation takes two patient people, ideally men who have the strength to manipulate the stairs. We actually bought a railing and spindles but never installed after staining.
3. I would highly recommend making a budget and sticking to it as best as you can. We did not. We started with a "rough" idea and were way off, however, a fair amount of that had to do with upgrades in materials (the basement bar is for my husband's brewing station) and the storage closet setup.
4. As far as unlevel floors, we found once you start framing, you can adjust with both the height of the boards and eventually, shims.
More notes: We used Ikea for a lot of the finished materials (bathroom/storage closet/wetbar), which did save a bundle.
If you need any silestone or granite, we use badolito(sp?) off of the whitemarsh exit of 95.
Anthony
Yes-our ceiling height is the same. We decided against a drop ceiling due to the limited space, and painted the support beams black (spray paint in some cases, regular black paint in others). We installed the ikea lights in between the rafters with two sets in the front half of the basement and another three way running down the hallway, and a third bank at the back for the "utility" area.
The ejector pump is installed in a crock, which we didn't install ourselves, but we had a family member do the work (licensed plumber). The jackhammering of concrete didn't seem too bad, but transporting the dirt and concrete remnants out of the basement was hellish. Can't remember where we ordered the pump etc. from (would suggest plumbing supply, not HD).
All other posts about showers-I'd highly recommend installing a shower if you have the funds and can allocate the space. In hindsight, I wish we had installed a shower so the basement "could" function as a separate suite for guests/family.
Good luck!
Basement Finishing Videos teaches you how to finish basement.If you are looking for basement finishing cost then basement finishing videos would help you. How to frame a basement to how to finish a basement , such questions would be solved.Basement basement finishing cost
You blog provide a very important details about the bench footing toronto and i really appreciate it.
bench footing toronto
Whats next after drywall when finishing basement?
basement remodeling marietta
I was really want to get some more detail and information about the leaky basement markham but your blog helped me so much thank you for sharing it.
leaky basement markham
Amazing, not everyone can do such jobs, at least we can't, we do want to but don't have the right skills. We had to hire a professional company to take care of our leaky basement, you can visit their website to learn more.
Basement Beginnings is a delightful read that captures the essence of starting anew. The author's vivid descriptions and engaging storytelling draw readers into a world of potential and transformation. It's a refreshing reminder that every journey, even from a basement, holds the promise of a bright and exciting future!Colorado Springs Basement Finishing
Basement Beginning has transformed our space into a cozy haven! Their expertise and dedication shine through, making every step of the process seamless and exciting. Highly recommend! Denver Basement Finishing Pros
Post a Comment