I decided to expose the brick in the wall adjacent to my stairway. This wall is continous along both the first and second floors. With my kitchen floors getting grouted yesterday morning, I thought it best to minimize dust downstairs. I had made a test cut in the drywall downstairs to see what was behind it. Turns out it was plaster applied to the brick, so I knew things were going to get a bit messy. The main bedroom was the first to get attacked, as the longest wall in the room had no (visible) electric runs along it. After reading a plethora of information on the web regarding exposing brick, I decided to just start tearing apart the wall and figuring it out as I go. For tools I used, a hammer and a couple of chisels. Safety glasses and a paper mask were used occassionally. :)
I made a hole in the drywall with a small saw, then started ripping the drywall away from the plaster. It was easy to remove as it was only attached to the plaster via furring strips along the edges. Not the most solid installation, but I'm not one to complain when it causes me less labor to rip out. A few hits with the small chisel made me wonder what I was getting it into. After the small chisel got things started, the larger chisel would come into play. I learned as I went along to start in an upper righthand corner, and move down and left. This works well if you are right handed as it allows an easier hammer swing. 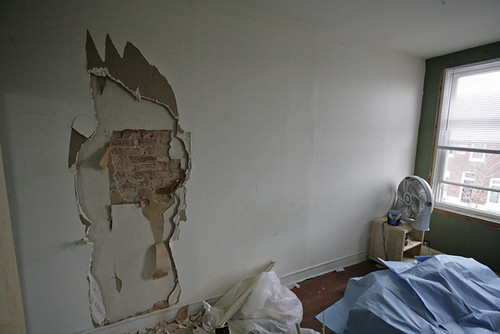
I also learned that less is more, when it comes to the amount of chiseling and prying to do. By using the larger chisel as close to parallel with the plaster between the wall, I hammered in the space as far as I could, trying not to pry. This was akin to peeling wallpaper slowly to keep them in longer strips. A lot of prying means a lot of chiseling. After a couple of hours Leigh showed up, and we started cleaning as we went. Chiseling is the easy part - clearing away all the debris is the hard part! 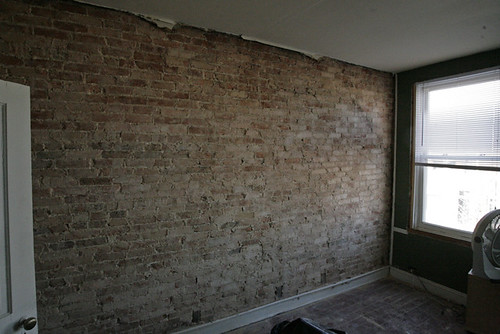
At the end of the day, the work was well worth it. The mortar is in decent condition, so I am going to try to avoid grinding our the mortar and repointing the brick. I like the natural look as is, and I really don't feel like making a bigger mess with an angle grinder. Today I get to brushing the plaster out of the brick, and using some muriatic acid on the brick to clean them.
Sunday, January 20, 2008
Exposing Brick
![]()
![]()
Subscribe to:
Post Comments (Atom)

21 comments:
It looks awesome! I can't believe someone decided to cover up that gorgeous brick. Let 'er breathe!
Thanks! It was indeed covered up, with plaster that had 4 layers of wallpaper on it. Lovely, flowerful wallpaper.
Dude the exposed brick looks great! Is there some way to, for lack of a better term, but "pressure wash" the brick? Of course there is the whole saturation of the upper level. I have seen pressure washers really clean up brick and give it back it's color. Then of course a sealer. When ya want my help, holla.
The picture shows the brick before Shane and I wired brushed and used the muriatic acid. Now the brick is more noticable after the white mortar has been scrubbed off the orange brick, but the sealer would really darken up the color. Not sure if I want it darker now though... The sealers make the brick look almost fake, unless I can find one that is different than is on my downstairs brick... I'll put up a picture soon of the brick after the cleaning.
I'll be tearing down the brick from the stairway wall all this weekend, so if you want to help I could really use it!
Looks GREAT!
some people have said to 'sandblast' the brick after you removed the plaster, is this true? did you sandblast your brick at all? thanks! your brick looks really great, i think i'm going to try it out myself! please post updated pics when you get the chance!
amy,
Interior brick sandblasting (or power washing) would have created too much mess (airborne or damaged floors!), so I would not recommend it. Pictures of the brick in a more finished state are posted, so just look through the archives using the 'exposed brick' tags.
For sealing the brick there are multiple options. I prefer a matte type of look to the brick as opposed to the gloss look that many seal with. I chose a matte sealer by Behr, applied with a sprayer and then rolled over with a paint roller to even things out. I used only one coat of sealer as I'm not trying to seal the elements completely out, but to just stop the brick from dropping it's effervescence. I was very pleased with this.
I first used elmer's glue and water (ratio of about 1:4) for the upstairs as I heard it provided a nice matte finish, but in the end it just left a white film on the brick. I would not recommend this approach.
A word of warning on exposing brick. The wall I exposed had brick that was near perfect and didn't required repointing. If I had tried to expose the brick in the opposite side of the house it would have required repointing, which would have been some major work with an angle grinder and a lot of new mortar. I suggest ripping out a test patch to check your brick condition before commiting to rip out a whole wall.
Also, expect a lot of mess. Everything in the area will be covered in dust, and hauling the plaster and drywall out of the house is hard work. There is a lot of debris from this job. The guy I called to haul away the debris had a rough day loading all this crap in his truck.
I closed on my house on the 4th and by the morning of the 5th I was exposing the brick wall. It was very rewarding at the end of the day to see, but I have a lot more to go.
how did you end up getting rid of all the plaster trash?
Jenny,
I looked up trash guys on craiglist. It should cost you around $60-80 a pick up truck sized load.
Good job getting this done first. Welcome to home ownership, and living in a dust pit. :)
I LOVE exposed brick! It's dreamy - great job!
Hey Corey,
Came across your blog through google. I'm exposing some brick walls in my Baltimore Row house as well. Do you have any technical advice from one do-it-yourselfer to another Do-it-yourselfer in over her head? I have my wire brushes and even bought an electric sander. If you have any links to send that would be great. Thanks a bunch.
Ps- when are you posting pics of the finished wall?
Shelly - Please follow the post labeled "exposed brick". I cover the process in a few posts. Make sure to read the comments for additional detail.
hey- love your blog. I just bought my baltimore house on Dec 30th and have been ripping it apart ever since. It took me and my boyfriend 1 month (working weekends and most nights) to tear out the plaster and repoint the brick in our bedroom. (we chiseled all the mortar out by hand!)
also, I love the CAD drawing you made for your bookshelves... I'm an engineer too and I'm about to sketch up my kitchen. I'm even tempted to use revit.
Keep up the good work!
The wall looks amazing! I have been living in my house in Baltimore for a year and discovering new things almost daily (usually not good). The former owner covered one of our living room walls with concrete, so we're having a bit of a tough time figuring out how to take down the concrete without compromising the brick wall. Removing plaster must sound like a piece of cake now!
Looking forward to following your blog since we all know Baltimore rowhouses need a lot of time and effort to restore their beauty. :)
stripping walls that are not dropping their plaster is the dumbest idea you could possibly have. especially in a rowhome. I hope you and your neighbors like the same music/tv/etc. So trendy. waste of time. Creates so much extra work. not classic. and not really modern either. Someone will be screwing typeX over it in 7years.
Hey Corey, Thanks for the awesome posts! I am planning on exposing the brick on the 1st-2nd floor stairwell in Baltimore rowhome soon. Fortunately it seems as though it is just up against firring strips and the brick should be in pretty good condition. How did you deal with the gaps between where there was drywall and the new brick? Also how did you do the stairwell? I'm not sure how I'm going to get into that area! Any advice would be greatly appreciated!
Matt
It was very interesting for me to read this article. Thanks for it. I like such topics and everything that is connected to this matter. I definitely want to read a bit more on that blog soon.
It was extremely interesting for me to read that post. Thanks for it. I like such themes and everything connected to them. I definitely want to read a bit more soon.
Hi Corey, thanks for posting, reading through all the comments has been very informative! I have exposed brick walls on the first and second floors of my house and have been very hesitant to seal them b/c I don't want to alter their appearance, but the dust is getting unmanageable. That being said, would you mind providing the exact name of the Behr sealer you used? Also, I should have just sealed the brick before I moved in, but now that I'm in, I'm really nervous about the mess sealing the brick could make. Any tips on prepping the wall (and surrounding areas)? Also, you said you sprayed the sealer, do you think rolling or brushing it on would work? I'm really nervous about getting "off-spray" on everything, and since I've moved everything in, and the walls literally run from the front of the house to the back, covering everything would be nearly impossible. Lastly, how bad was the smell? Could I seal the walls during the day and sleep in the house at night, or would I have to leave for a couple days? Any info will be greatly appreciated! Thanks!
Post a Comment