We really appreciated all of the comments to the last post. There was definitely some sound advice, and as a result of this we've changed around what we're doing. To those people out there renovating who don't have a blog, I suggest starting one. Blogs provide a great means to ask a question and get responses from others who are in a similar situation.
We're avoiding PMI (called MMI for FHA loans). For an FHA mortgage greater than 15 years and an LTV greater than 0.78, but less than 0.95, you have to pay MMI. We are between this area. MMI stops when you reach a LTV less than .78. Unfortunately, you must pay this MMI for a minimum of 5 years. This adds up to about $6k for 5 years for us. I don't know about you, but I don't like paying $6k for nothing.
For a mortgage that is 15 years or less, there is no MMI for any LTV less than 0.9. For this reason, we are going with a 15 year loan. There is still an up front cost on both mortgages, but no additional monthly payments for the 15 year. This loan requires higher payments, but we can swing it, and we're viewing it as a forced savings plan as the extra money is going toward principal.
As for the loan value, we are only taking out enough to pay off the refi fees and the credit cards. The back yard and HVAC stuff, will be paid out of pocket. I thought about pulling out more money, but I don't want to pay $7200 over the life of the loan for every $5k taken out now. Even if we have to use a credit cards for short term needs it is still a much cheaper solution that the $2200 in interest (per $5K) than the loan would provide.
It feels good to own a smaller home that doing a 15 year mortgage is even an option. While home values may still go down, there is security in knowing that we have enough home equity to be able to move without having to pay money out of pocket.
Thursday, January 29, 2009
Fiscal Conservatism
Wednesday, January 28, 2009
How Much Equity to Take Out?
Since we locked our 5% refinance rate in early December we've been working hard with the intent to pull some equity out of the house. Our hard work has paid off, and the appraisal came back with a value of $5,000 greater than what we were hoping for. All in all we've probably broken even through all of the renovations, but we love the house, and we've learned so much in the process that it has all been worth it.
Since the appraisal is done we're in the enviable position to take out more money than we currently need. We'll be using our equity to pay down credit cards that were used to buy reno materials, and putting some money away to deal with the backyard and keeping extra cash ready for when the HVAC system goes. Beyond this, any money we take out could be used for whatever we want.
The bad news is that we are going with an FHA mortgage, and our mortgage will be above the .78 loan to value ratio after taking out the money for credit card/yard/hvac. This means that we'll have to pay PMI on the money we take out. Any additional money we take out, is just more PMI.
I'm torn. Do we take out a little extra money now, or do we take out only what we need now since the interest rates are low. While I know the more fiscally responsible answer, if you had the chance for the money now, would you take it?
Sunday, January 25, 2009
Pajama Jammy Jam!
With the house pretty well renovated, and the appraisal done (you'll have to wait for more info on this), we decided it was time to have a party. A pajama party. Our friends came over last night for a joint housewarming party slash birthday party for my friend Sterling. We got a keg, a case of other alcohol, some hors d'oeuvres, and our friend Dave brought over his DJ equipment. Yeah, we know how to party.
People toured the house and were duly impressed with the work we've done in the past year. However, they were confused when they got to the second bedroom... In this room I set up my camera on a tripod, hooked it up to a TV, printer and a remote camera switch to it, and had three strobes placed around the room. People weren't sure if this was how the room looked normally. I assured them this was only for the party. What they didn't understand, is that it was a photo booth.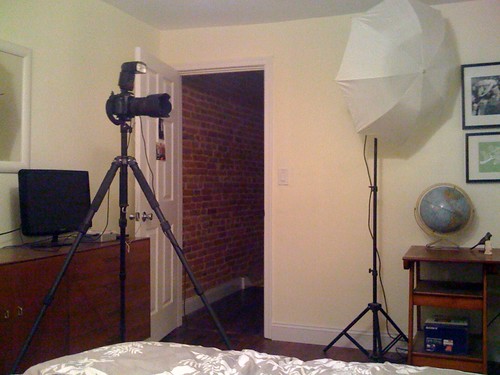
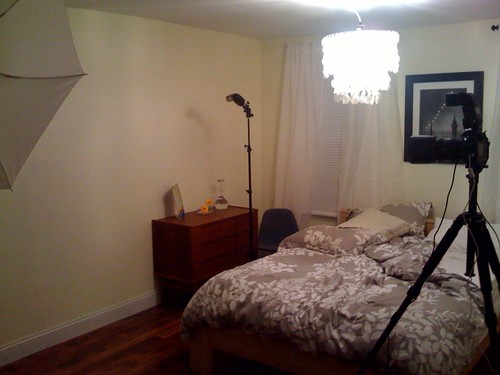
Click each picture for details on the gear in the picture
All people had to do was stand in front of the camera and hit the button on the remote to take a picture. When they hit the button three strobes went off, freezing their drunken moment in time. After the shot was taken their picture was shown on the LCD TV pointed back at them. If they liked the picture they could click a button on the camera and have it printed out. The whole setup was a blast.
And now is the time in the post where I get to place random commentary on some photos from the night. :-)
This was early in the night. Notice the sober look.
Apparently Shane wasn't pleased. Or was having a very emo moment. 
Yeah, baby, yeah!
Saturday night fever. Work it. Work it. 
When Matt opened his robe I was grateful he was wearing undies. 
Why so serious?
The girls thought it would be fun to do some headbanging. The queen's neck is still sore for this endeavor.
Say cheese!
There are a lot of pictures like this, with people staring at the monitor and laughing about the previous picture. 
The Queen and I. In all of our PJ'd glory.
Wally even got pulled into the melee. What you can't really see is that he was wearing a childrens robe we picked up at Target. 
This is her poker face. 
Why am I smirking? This was probably soon after we killed the keg. :-)
Jeff scaring his girlfriend away.
Check out the full slide show for all the pictures taken from the photobooth. The shots are in order from the beginning of the night until the end, and this set has every picture taken. :-)
Monday, January 12, 2009
Downstairs Reveal
Hi - come on in and take a look at the downstairs. 
Ok, maybe this picture was from a while ago after I climbed around in the attic, but the following ones are brand spanking new.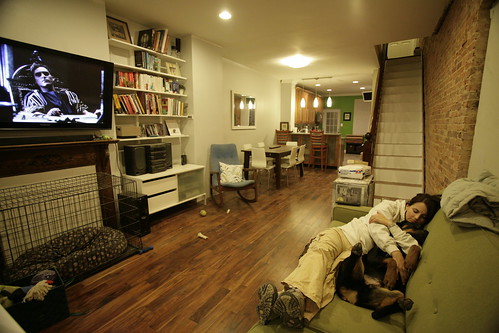
Notice the Queen and Wally snuggling on the couch as Joaquin Phoenix looks down on them. 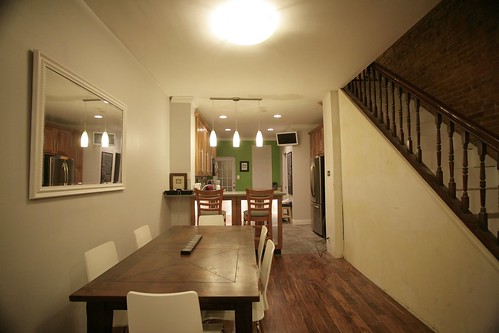
It feels great to actually have the mango dining table and white ikea chairs in the space. We think they look great and fit well into the small'ish space. 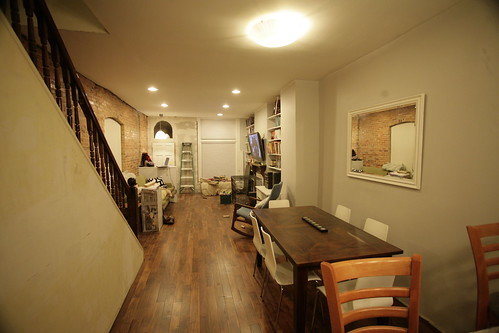
There is still work to be done, but it feels good to have the end in sight. :-)
Thursday, January 8, 2009
Basement Update
I came home from work early to deal with B-dry and our basement water issue. When they came in I pointed to their newly done area, only for them to point out my sump pump wasn't working. It had come unplugged. I felt like a complete dolt whe they pointed at the home's deficiency, but was pleased when they volunteered to wire an extra outlet to make sure the sump didn't come unplugged for no charge. I'm a pro at wiring outlets, but I appreciated their willingness to please when they had no obligation to do so.
On a separate note, the Queen and I have been working like dogs from the time we get home until at least 10 each night. Things have been busy, but at least we're making progress. :-)
Wednesday, January 7, 2009
When it Rains, It Pours
Remember when B-dry came out to fix the foundation because we had standing water in the basement? I do. I went in the basement this morning to find standing water which appeared to be coming from the newly repaired area.
*sigh*
One more thing to deal with. Joy.
Tuesday, January 6, 2009
Planning Ahead
On Black Friday we braved the crowds and headed to Sears to pick out a new washer and dryer. The current dryer has been screeching like a howler monkey for months, and the washer has a constant pool of water in the pan below the unit. Not good. We got a great deal on an energy efficent front load washer and gas dryer, picking up the pair for $675 delivered, and the old units removed. Unfortunately the units were on back order until mid to late February. This wouldn't be a problem if our dryer stopped working last weekend... DOH!
My mother, the Queen's mom, and the Queen went to Sears to see what they could do to remedy our situation. They were able to somehow get us an upgraded washer and dryer, arriving next weekend. Regular price of this combo is $1490, and we're getting it for $675. In the words of Borat, "VERY NICE!"
As an aside, I'm always thinking about the future and how to upgrade the house to minimize overall costs. For instance, we are getting a gas dryer even though our current dryer is electric. Here is the history and reasoning that lead to this decision...
1. During the kitchen renovation, I noticed the electric dryer wasn't exhausting outside. I had the contractor add a vent, but knew the current placement of the dryer left it too far to actually hook the vent up. I want to finish the front of the basement, which means eventually moving the dryer toward the back of the house and since the wall was open at the location of the vent figured it was as good a time as any to add this. While a vent is a good idea to minimize moisture in basements, it isn't required for an electric dryer. I figured I'd add the vent for the future, and I'm glad I did as a gas dryer requires a vent because of the carbon monoxide gas exhaust.
2. When wiring the upstairs bathroom two dedicated circuits were added to bring it up to code. Previously, the bathroom didn't have any dedicated circuits. With adding two circuits my 100 amp breaker was now full. Since I want to eventually finish the basement, and I don't want to upgrade to a 200A service unless I have to, I needed to find a way to eliminate a circuit or two. With the replacement of the dryer looming, I figured that by switching to a gas dryer I'd be able to run a gas dryer off the same circuit as the washing machine. This would allow the elimination of the two circuits dedicated to the 220 VAC circuit for the electric dryer. This results in no panel upgrade required. Panel upgrades aren't cheap, so I think this is a good idea.
3. We need to add a gas line to the dryer. This shouldn't be a big deal, but with wanting to eventually finish the front of the basement the current gas line runs below the basement joists through the middle of the space. We could just add a gas line for the dryer off this old line, but we'd eventually have to rip it all out when we renovate the basement. Instead we are opting to have the gas line routed to the side of the space. This results in higher near term costs, but results in zero re-work in the future. Luckily I know a $30/hour plumber, so the costs for this are manageable.
The moral of the story is that we're getting a new washer and dryer, that will result in near term costs for gas line upgrades, but will save us money in the long run due to high efficiency and not requiring us to upgrade the electrical panel later. Sure it may cost more now, but the costs are worth it in the long run.
The List
As we head down the home stretch to the appraisal, we've created a list on the chalkboard in the kitchen. The Queen loves lists, as it feels great to cross things off upon completion. To me, they are a bit overwhelming, but I understand their necessity.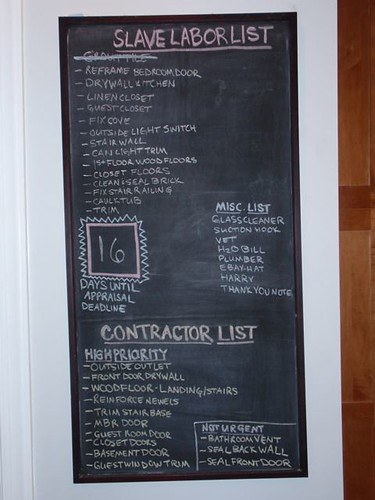
I don't like having contractors do much work at all, as I am usually disappointed with the quality/cost ratio, but with a deadline looming we need a bit of help.
Monday, January 5, 2009
Pictures of the Queen
This post has nothing to do with renovation, but I figured the Queen would smile when reading this post in the morning.


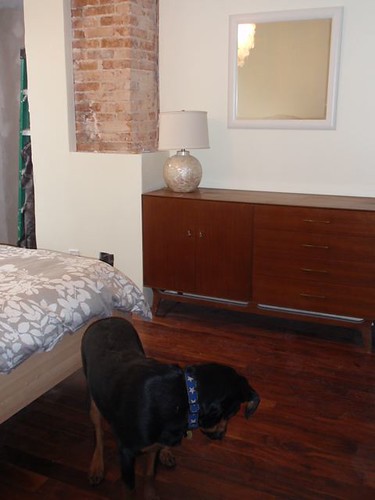
Guest Bedroom Transformation
The last week and a half have been a whirlwind. I had off from Christmas Eve until today, allowing plenty of time to work on the house. And there is plenty of work to report. In the past week all of Leigh's family to help at one point or another, my mother and father drove in from Detroit to help out for a full week, my coworker helped lay wood floors, and I had contractors at the house for some of the time helping out too. So much work was completed that I can't cover it in one post. This post will document the transformation of the guest bedroom.
To start, you have to understand how horrible the room was when I moved in. The previous owner painted a beautiful mural in the room. My parents came to visit soon after I purchased the house and stayed in this second room. You can tell by the look on my father's face how much he enjoyed the mural. 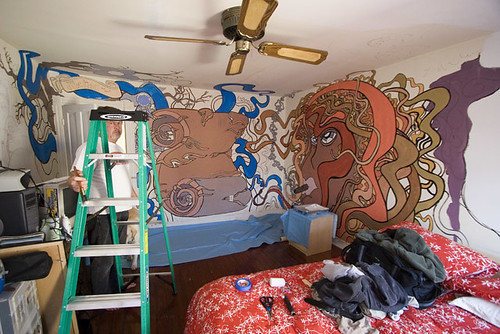
By the time they left, a single coat of primer applied to hide the evil Medusa mural. It didn't hide it much, but at least Medusa was a bit subdued.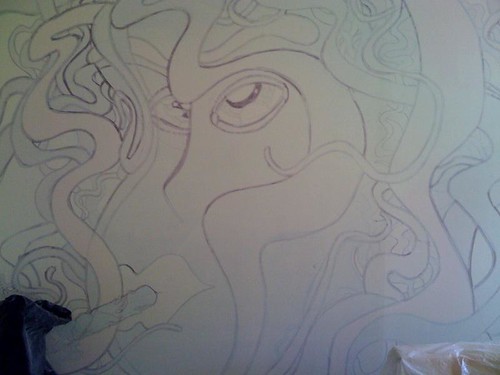
The room stayed this way until the Queen moved in. At that time, we needed a place to store her stuff while we renovated so the guest bedroom was turned into a storage shed. 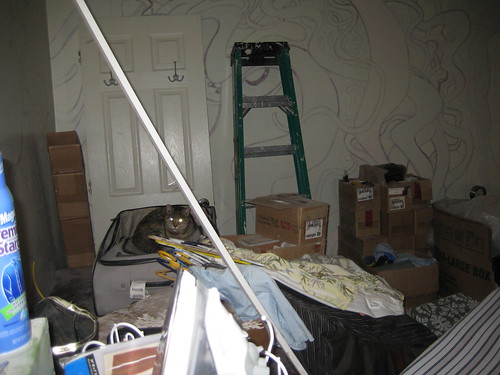
Notice the cat in the middle of the room. She enjoyed the space just fine as a storage space.
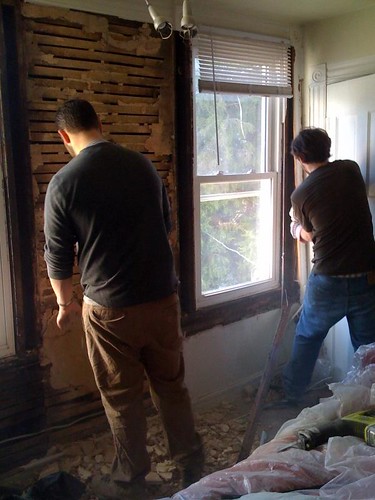
As renovation progressed we've been able to slowly clear out this room. A few months ago I noticed one of the windows was broken. I knew this was a bad sign, as the window is on a 5' unsupported overhang of the house, so I figured this area was settling. When we ripped out the back wall a few weeks ago we discovered we had a bigger problem than I had previously thought. Termites. 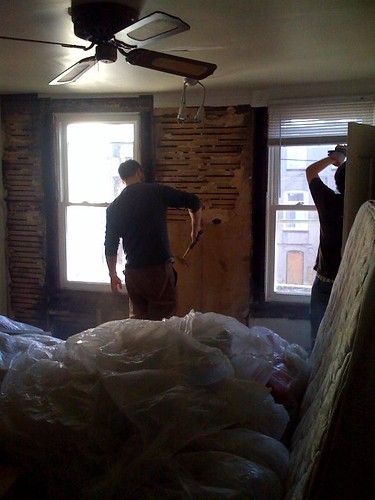
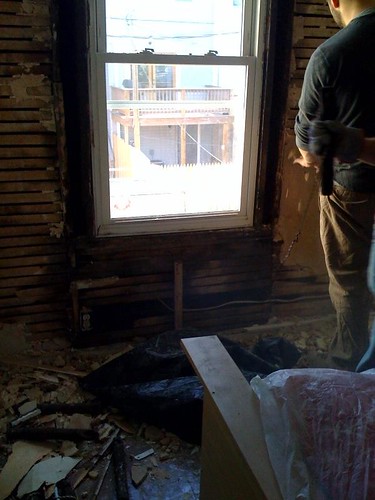
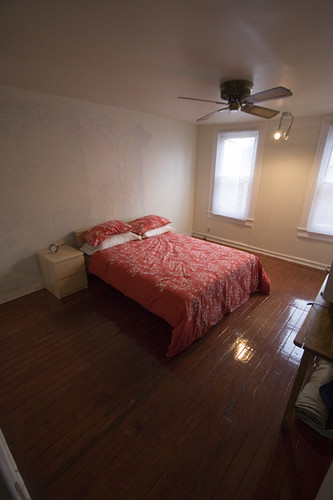
In a matter of a few weeks we've come a long way.
Here is a rundown of the work done in the room.
A lot more work was done in the past week, and there is a lot more detailed explanation of the work done, but I'll save that for later. There is still some more work to be done in the room, like completing the trim and finishing the closet, but we are very pleased with the progress.
Thank you so much for everybody's help - words can't express our gratitude.
Subscribe to:
Posts (Atom)
